Cyberopex

Setting up a SIEM for small and medium-sized enterprises - Part 2: Creating rules for alerts

Table of Content:

Part 2: Creating rules for alerts

Welcome to our blog post about creating alert rules in Elastic Security. A robust alerting system is essential for more and more organizations as attackers become more sophisticated and sophisticated. Elastic Security offers advanced threat detection tools, but the key to success lies in the correct configuration of alert rules. In this article, we explain step-by-step how to set up accurate and effective alerts to optimize your security measures and respond faster to threats.


The importance of alerting rules

Alerting rules are the backbone of any effective security strategy. They allow you to define specific criteria that, when met, trigger an immediate notification. This is crucial to protect your IT infrastructure from known and emerging threats. But how do you go about creating effective rules that actually do what they are supposed to? In this post, we'll cover just that.

First of all, why are alerting rules important at all? Cyberattacks are becoming more frequent and sophisticated, and early detection of anomalies and suspicious activity offers the best chance of preventing potential breaches or at least minimizing their damage. Rules not only help to make real-time monitoring efficient, but also improve the overall incident response capability of the security team.

Types of alerting rules

There are different types of alerting rules that can be applied differently depending on the security needs and IT environment. Some common types are:

  • Query-based rules: These rules trigger alerts when log data fulfill specific, predefined queries.
  • Anomaly detection rulesMachine learning algorithms are used to detect behavior that deviates from normal activity patterns.
  • Threshold rulesThese rules trigger an alarm if the activity exceeds a certain quantitative threshold.
  • Correlation rulesThey make it possible to link several events in order to identify complex attack patterns.


This article deals exclusively with the creation of query-based rules.

Rule definition and automation

The rule definition process starts with determining exactly what you want to monitor. From there, you choose the type of rule based on the requirements of your environment. Once a rule is defined, the next step is automation. Modern security platforms allow you to automate responses to detected threats, from simple notifications to complex scripts that initiate countermeasures.

Practical example: Detection of a Metasploit attack

To illustrate the practicality of our explanations, let's take an example where an attack is carried out using the Metasploit framework based on a tactic from the MITRE ATT&CK framework. Our alerting rule is configured to detect this specific type of attack, demonstrating how specific yet robust alerting rules can be.

In the rest of this post, we will describe in detail how you can set up and test this type of rule.

Our setup is as follows:

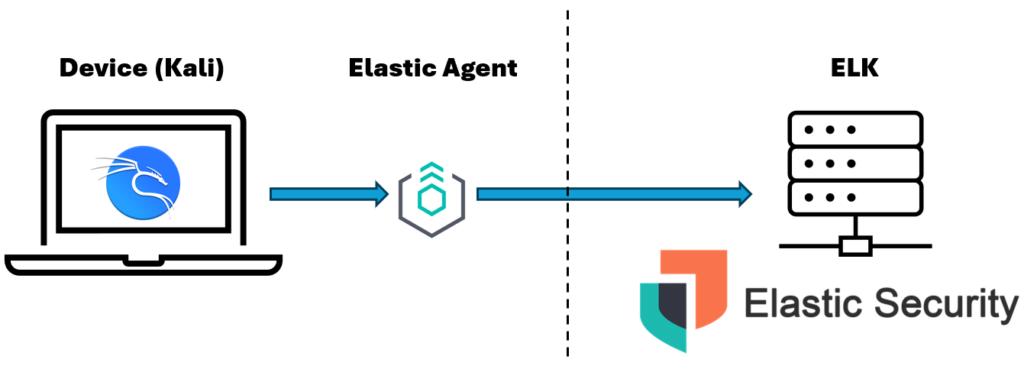
To successfully complete part 2 it is necessary to have a running ELK environment that is able to receive logs from a client. This was covered in our part 1.

Step 1: Create a new rule

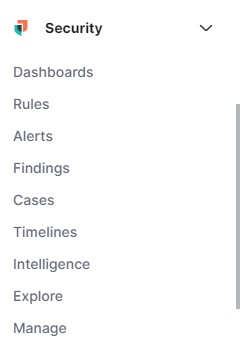
You will find the "Rules" section in the sidebar under Security. We will now create a new rule here.
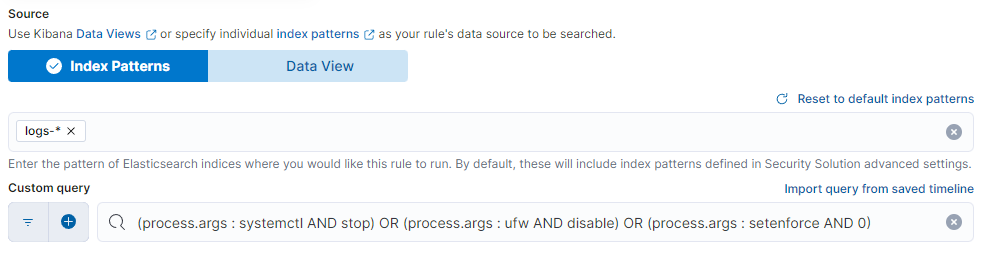
Step 2.1: Selecting the strategy

To develop a sophisticated detection system specifically designed to identify and combat such attack techniques, the MITRE ATT&CK framework provides an excellent foundation. By integrating this framework into the security strategy, you can not only understand the different attack techniques, but also create effective detection rules based on real-world scenarios. For our first rule, we have chosen the technique T1562.001.

The T1562.001 technique focuses on disabling or bypassing security software such as antivirus programs, firewalls or intrusion detection systems. The aim of this technique is to weaken or disable existing protection mechanisms in order to allow unhindered access to a system and facilitate the execution of malicious activities.

We will mainly use the "process.args" field for this purpose. The rule presented is for learning purposes and can vary greatly depending on the application area. The next step is to select our index. In our case, we select all logs, which would be logs-*. And as a search query the following:

				
					(process.args : systemctl AND stop) OR (process.args : ufw AND disable) OR (process.args : setenforce AND 0)


systemctl AND stop:

The command systemctl stop is used to stop services on systems that use systemd as an init system. Monitoring this command is important as attackers could use it to disable critical security services such as firewalls, antivirus programs or other protection mechanisms, making the system more vulnerable to further attacks.

ufw AND disable:

ufw disable disables the Uncomplicated Firewall (UFW), the default firewall on many Linux distributions. Recognizing this command is important because disabling the firewall can make it easier for an attacker to make undetected network accesses or send malicious traffic, which significantly lowers the security level of the system.

setenforce AND 0:

The command setenforce 0 switches SELinux (Security-Enhanced Linux) to permissive mode, which does not enforce security policies, but only issues warnings for activities that violate the policies. Monitoring this command is critical because relaxing SELinux restrictions allows attackers to perform various security-related operations that would otherwise be blocked or restricted.

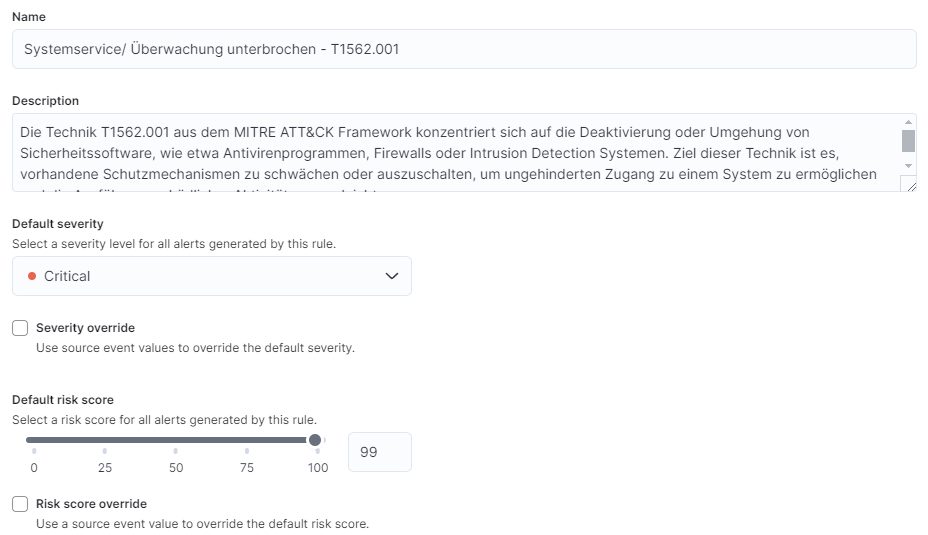
Step 2.2: Naming and description

The naming can vary depending on the organization/needs. However, please note 3 points:

  • ConsistentThe use of a consistent naming scheme makes it easier to find and manage rules, especially in large or complex environments.
  • MeaningfulNames should be precise and descriptive to give immediate insight into what the rule does or what threat or activity it targets.
  • CompactWhile names should be informative, it is also important that they are short and concise to avoid clutter and confusion.


Points that can typically be included in the description of a safety rule:

  • Purpose of the rule
  • How the rule works
  • Trigger
  • Expected actions
  • Context and relevance
  • Configuration details
  • Inspection interval
  • References
 

The criticality also depends heavily on the area of application of the rule; in this example, our Kali device is a particularly sensitive device. We therefore set the criticality to critical with a risk score of 99. The following is an example.

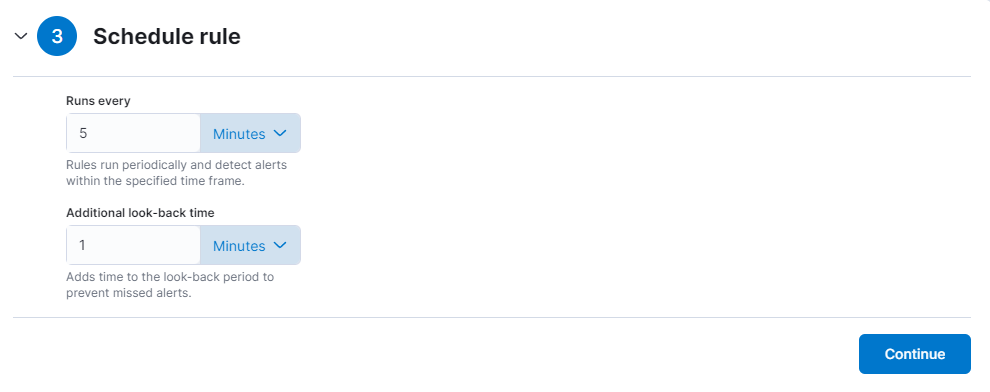
Step 3: Create a new alert

We set the time to every 5 minutes as we want to test this rule immediately afterwards.
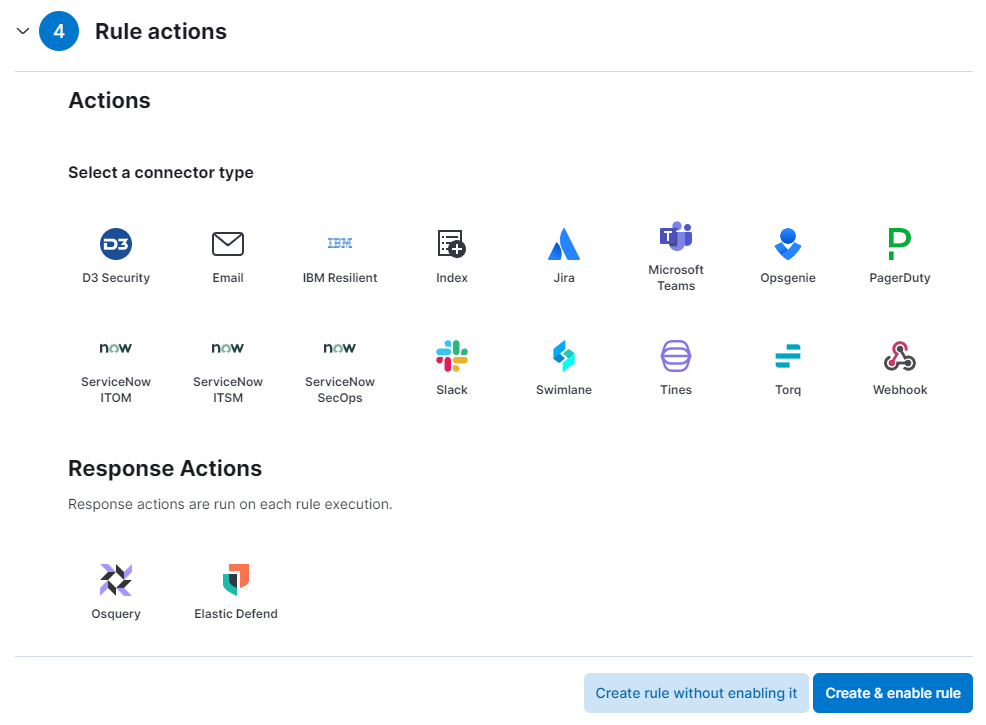
Step 4: Automation

We do not set a rule action. If necessary, you have a variety of options for executing a subsequent action.

Congratulations, you have successfully created your first rule!

Step 5: Verify that the rule works

Now we want to test the rule. To do this, we enter the following into the terminal of our Kali machine:

				
					sudo ufw disable


The command sudo ufw disable is used to deactivate the Uncomplicated Firewall (UFW) on a Linux system. The use of sudo allows the command to be executed with administrator rights, which is required to change firewall settings. This command stops the firewall, which overrides all rules defined by UFW and stops filtering network traffic. After successful completion, it looks like this:

The following command is suitable for restarting the firewall:

				
					sudo ufw enable


Once the "System service/monitoring interrupted - T1562.001" rule has been implemented, it is crucial to check its effectiveness. This check is carried out by analyzing the triggered alerts, as shown in the Alerts dashboard. In the current example, the dashboard shows a critical alert triggered by this specific rule, indicating successful detection.

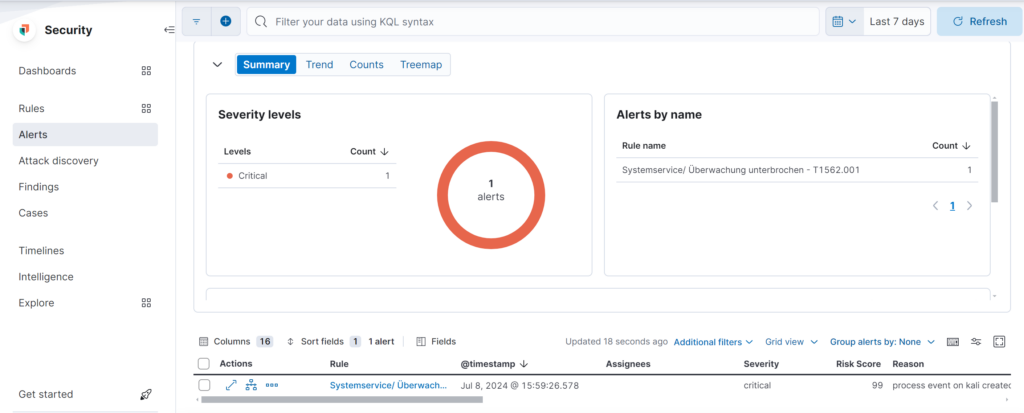
The details of the alarm, including the timestamp and risk score, provide important information about the incident. A high risk score of 99 and the marking as critical confirm the seriousness of the detected incident. In addition, the analysis of the reason for the alert, given here as "process event on kali created", should be investigated further to fully understand the nature of the attack and plan appropriate response steps.

This process not only confirms that the rule is working, but also serves as a basis for future adjustments and improvements to the detection system. It is important to regularly check whether the rules are working as expected and to adjust them if necessary in order to continuously improve the security situation.

Part 3

In part 3 of our blog post series, we cover the steps required to set up a functioning Security Information and Event Management (SIEM) system. This includes the integration and normalization of the required logs as well as the application of threat intelligence.

FAQ

More about Elastic ELK and SIEM

What is ELK?

ELK stands for Elasticsearch, Logstash and Kibana - a combination of three open source tools that work together to provide a powerful solution for log management and data analysis.

What is Elasticsearch?

Elasticsearch is a distributed, RESTful search and analytics engine capable of processing and analyzing large amounts of data in real time.

How is ELK used in the context of SIEM?

In the context of SIEM, ELK is often used to collect, process and visualize log data, which facilitates security analyses and enables threats to be detected more quickly.

What is SIEM and how does it work?

SIEM (Security Information and Event Management) is a software solution that provides real-time monitoring, event logging, data correlation and alerting to improve network security.

Why is Elasticsearch used in SIEM systems?

Elasticsearch enables SIEM systems to efficiently index and search large volumes of security data, supporting rapid detection and response to security incidents.

HOW CAN WE HELP ?

Contact our experts at CYBEROPEX 

We look forward to your inquiry and will do our best to answer it promptly.